Deze workshop is geschreven in 2020. De software die je gebruikt is inmiddels veranderd. Je komt er vast wel uit.
Deze workshop gebruikt de Arduino IDE als programmeer omgeving.
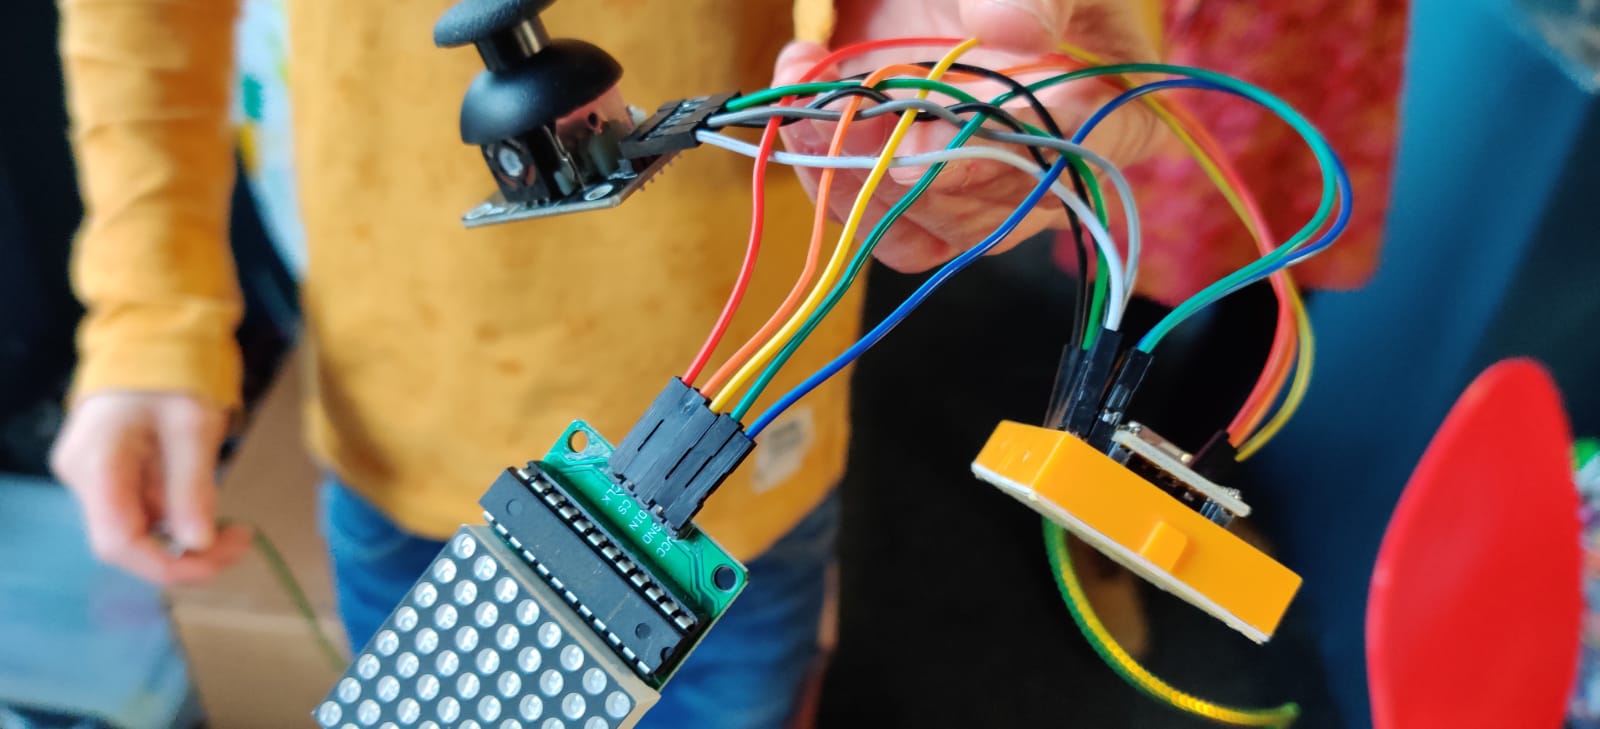
Onze vaste bezoeker Ties heeft een mooi voorbeeld gemaakt met een Arduino, de LedMatrix en een Joystick. Hij legt uit:
Hoi Marco,
Ik zal je even vertellen hoe je de LedMatrix maakt.
Wat heb je nodig
- Een LedMatrixbordje MAX7219.
- 10 snoertjes (jumpers).
- Usb snoer.
- Arduino nano.
- Breadboard.
- Joystick.
Library toevoegen
Voor dit project hebben we de ‘LedControl’ library door ‘Eberhard Fahle’ nodig. Als je deze nog niet eerder geïnstalleerd had, kun je de library volgens de instructies die hier staan beschreven installeren: ‘Een Arduino library downloaden’.
Arduino instellen
- In de Arduino IDE, bij hulpmiddelen moet je de poort eerst op de hoogste poort zetten (als je bijvoorbeeld 2 poorten ziet zoals poort 3 en poort 10, klik dan op 10).
- Soldeer de twee lange headers op de arduino nano.
- Prik ‘m op het breadboard.
Pak dan het ledmatrixbordje
- Zet op de gnd een jumpertje en verbind die met de gnd bij de Arduino.
- Zet op het ledmatrixbordje de vcc aan de 5V van de Arduino.
- Zet op het ledmatrixbordje de DIN aan de D12 van de Arduino.
- Zet op het ledmatrixbordje de cs aan de D10 van de Arduino.
- Zet op het ledmatrixbordje de CLK aan de D11 van de Arduino.
Dan gaan we naar de joystick
- Zet op de joystick de gnd aan de gnd van de Arduino.
- Zet op de joystick de +5V aan de 5V van de Arduino.
- Zet op de joystick de VRX van de X potmeter aan de A0 van de Arduino.
- Zet op de joystick de VRY van de Y potmeter aan de A1 van de Arduino.
- Zet op de joystick de SW van de switch aan de A2 van de Arduino.
VRX en VRY zijn analoge poorten, SW is een digitale poort.
Dan gaan we beginnen met programmeren
We hebben een sketch gedownload, en daarin hebben we de poorten veranderd. Ook hebben we de nullen en enen veranderd zodat je zelf een figuur kan maken. Het resultaat zie je hieronder.
Kopieer dit in arduino en dan uploaden.
 //We always have to include the library
#include "LedControl.h"

/*
Now we need a LedControl to work with.
***** These pin numbers will probably not work with your hardware *****
pin 12 is connected to the DataIn
pin 11 is connected to the CLK
pin 10 is connected to LOAD
We have only a single MAX72XX.
*/
LedControl lc = LedControl(12, 11, 10, 1);

/* we always wait a bit between updates of the display */
unsigned long delaytime = 100;
int sensorValue = 0; // value read from the pot
int outputValue = 0; // value output to the PWM (analog out)
const int analogInPin = A0;

int sensorValue1 = 0; // value read from the pot
int outputValue1 = 0; // value output to the PWM (analog out)
const int analogInPin1 = A1;

int sensorValue2 = 0; // value read from the pot
int outputValue2 = 0; // value output to the PWM (analog out)
const int digitalInPin1 = A2;
const int digitalInPin2 = A2;

void setup() {
  pinMode(A2, INPUT_PULLUP);
  /*
  The MAX72XX is in power-saving mode on startup,
  we have to do a wakeup call
  */
  lc.shutdown(0, false);
  /* Set the brightness to a medium values */
  lc.setIntensity(0, 8);
  /* and clear the display */
  lc.clearDisplay(0);
}

void loop() {
  sensorValue = analogRead(analogInPin);
  // map it to the range of the analog out:
  outputValue = map(sensorValue, 0, 1023, 0, 255);

  sensorValue1 = analogRead(analogInPin1);
  // map it to the range of the analog out:
  outputValue1 = map(sensorValue1, 0, 1023, 0, 255);

  sensorValue2 = digitalRead(digitalInPin2);
  // map it to the range of the digital out:
  // outputValue2 = map(sensorValue2, 0, 1023, 0, 255);
  outputValue2 = sensorValue2;

  if (outputValue > 150) {
    lc.setRow(0, 0, 0b00011000);
    lc.setRow(0, 1, 0b00011000);
    lc.setRow(0, 2, 0b00011000);
    lc.setRow(0, 3, 0b00011000);
    lc.setRow(0, 4, 0b00011000);
    lc.setRow(0, 5, 0b01111110);
    lc.setRow(0, 6, 0b00111100);
    lc.setRow(0, 7, 0b00011000);
  }
  if (outputValue < 100) {
    lc.setRow(0, 0, 0b00011000);
    lc.setRow(0, 1, 0b00111100);
    lc.setRow(0, 2, 0b01111110);
    lc.setRow(0, 3, 0b00011000);
    lc.setRow(0, 4, 0b00011000);
    lc.setRow(0, 5, 0b00011000);
    lc.setRow(0, 6, 0b00011000);
    lc.setRow(0, 7, 0b00011000);
  }
  if (outputValue1 > 150) {
    lc.setRow(0, 0, 0b00000000);
    lc.setRow(0, 1, 0b00100000);
    lc.setRow(0, 2, 0b01100000);
    lc.setRow(0, 3, 0b11111111);
    lc.setRow(0, 4, 0b11111111);
    lc.setRow(0, 5, 0b01100000);
    lc.setRow(0, 6, 0b00100000);
    lc.setRow(0, 7, 0b00000000);
  }

  if (outputValue1 < 100) {
    lc.setRow(0, 0, 0b00000000);
    lc.setRow(0, 1, 0b00000100);
    lc.setRow(0, 2, 0b00000110);
    lc.setRow(0, 3, 0b11111111);
    lc.setRow(0, 4, 0b11111111);
    lc.setRow(0, 5, 0b00000110);
    lc.setRow(0, 6, 0b00000100);
    lc.setRow(0, 7, 0b00000000);
  }

  if (outputValue2 == 0) {
    lc.setRow(0, 0, 0b00000000);
    lc.setRow(0, 1, 0b00000000);
    lc.setRow(0, 2, 0b00000000);
    lc.setRow(0, 3, 0b00011000);
    lc.setRow(0, 4, 0b00011000);
    lc.setRow(0, 5, 0b00000000);
    lc.setRow(0, 6, 0b00000000);
    lc.setRow(0, 7, 0b00000000);
  }
}
Kijk maar eens of het werkt!
Groetjes, Ties